

How To Stop Messages" Disc F Clean Up
Several users accept been reaching u.s.a. with questions after being increasingly annoyed by the fact that their microphone is automatically adjusting without any user intervention. Most affected users are reporting that the microphone levels either go upwardly or down, with no apparent trigger. The issue is reported to occur with multiple applications (born or third party).
What is causing the Microphone Levels to Machine-Conform on Windows x?
We investigated this detail outcome by looking at various user reports and the repair strategies that are usually being used to resolve this item issue on Windows ten. As it turns out, there are several unlike culprits that take the potential of producing this problem:
- Skype is automatically adjusting the microphone – If Skype (UWP or desktop version) is configured to launch at every system startup, chances are that's you're the culprit responsible for the automated microphone adjustments. In this instance, you should be able to resolve the issue by disabling the automatic microphone adjustment settings.
- Steam is automatically adjusting the microphone – Just like Skype, Steam is also capable of automatically adjusting the microphone if information technology's configured to be launched at every organisation startup. If this scenario is applicable to your situation, you lot should exist able to resolve the outcome past accessing the Friends List settings and disabling Automated Volume/gain control.
- An application takes exclusive command of the microphone – Some other possibility is a different awarding that is allowed to have exclusive control to the recording device and accommodate it's level automatically. In this example, you should exist able to resolve the issue by disabling exclusive manner or past booting in make clean way to identify the culprit.
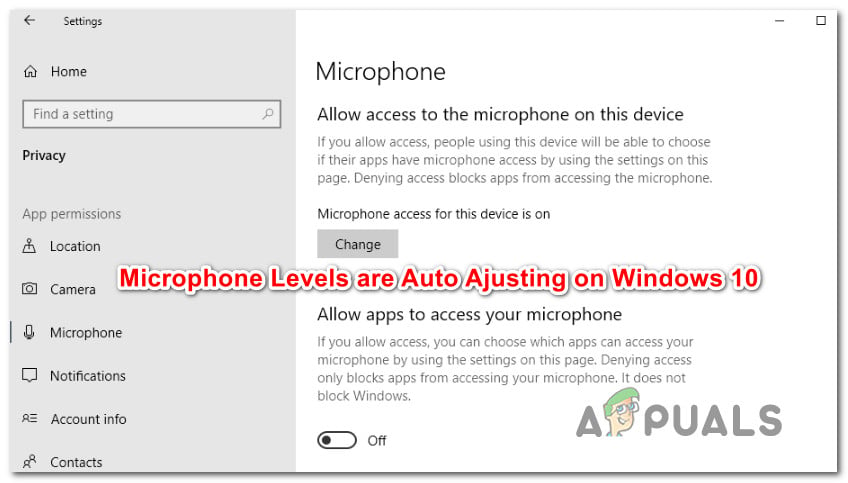
- Microphone level is not manually adjusted – Windows includes a toggle that should let you to override whatever awarding that might be adjusting the microphone level automatically. Several affected users have reported that using this process immune them to resolve the issue indefinitely.
- Outdated or corrupted microphone commuter – An improper commuter tin also be responsible for this particular microphone trouble. As it turns out, an outdated commuter has the potential of triggering this behavior (the same goes for a corrupted driver). In this instance, yous should be able to resolve the issue replacing the current microphone driver with the latest version available.
- Malware infection – THis particular event can also be caused by a malware capable of shutting down the microphone or adjusting the level to a maximum level at all times. Several afflicted users accept reported that they managed to find the virus and deal with information technology by performing a Malwarebytes browse.
If you're currently struggling to resolve this error, this article will provide you with several different troubleshooting steps. Down beneath, you'll observe a collection of methods that other users in a similar scenario have successfully used to resolve the microphone upshot on Windows 10. Each of the potential fixes featured below is confirmed to be effective by at least i afflicted user.
For the all-time results, we advise you to follow the methods in the order that they are presented since we ordered them by efficiency and severity. One of them is bound to resolve the result regardless of the culprit that'south causing information technology.
1. Preventing Skype from automatically adjusting the microphone (if applicable)
If y'all have the addiction of keeping Skype open most of the time, gamble are the VoIP customer is really adjusting your microphone levels without telling you. Equally it turns out, Skype is configured by default to be allowed to modify the volume of your continued microphones. This happens with both the desktop and the UWP version of Skype.
Several affected users accept reported that they managed to resolve the issue indefinitely by accessing Skype'south settings and disabling the client'southward power to conform the microphone level's. Here's a quick guide on how to do this:
- Open Skype UWP and click the action button (pinnacle-left section of the screen) and click on the activeness button (3-dot icon). Then, from the context card, click on Settings.

Accessing the settings menu of Skype Note: If you're using the desktop version of Skype, employ the ribbon bar at the top to get to Tools > Options.
- One time yous're inside the Settings tab, select the Audio & Video tab from the vertical menu on the left.
- Inside the Audio & Video tab, scroll down to the Microphone section (nether Sound) and uncheck the box associated with Automatically adjust microphone settings.
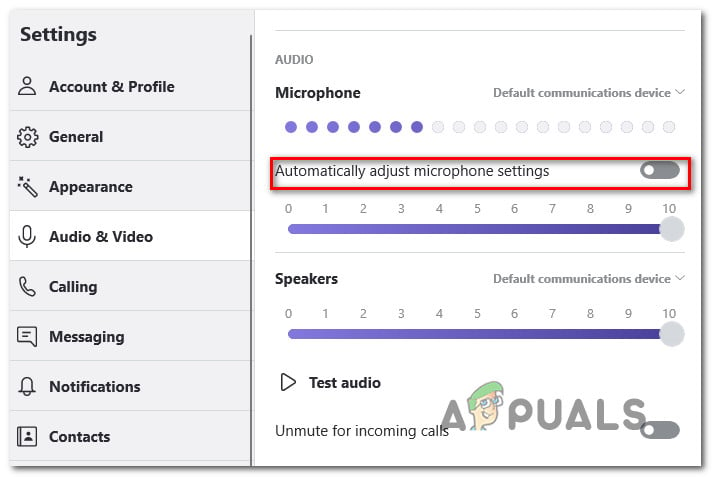
Preventing Skype from adjusting the microphone Note: If yous're using the desktop version of Skype, go to Audio Settings and uncheck Automatically adjust microphone settings.
- Utilize your computer ordinarily and see if you're however encountering the auto microphone adjustments. If the same result is still occurring, motion down to the next method below.
2. Preventing Steam from automatically adjusting the microphone level (if applicable)
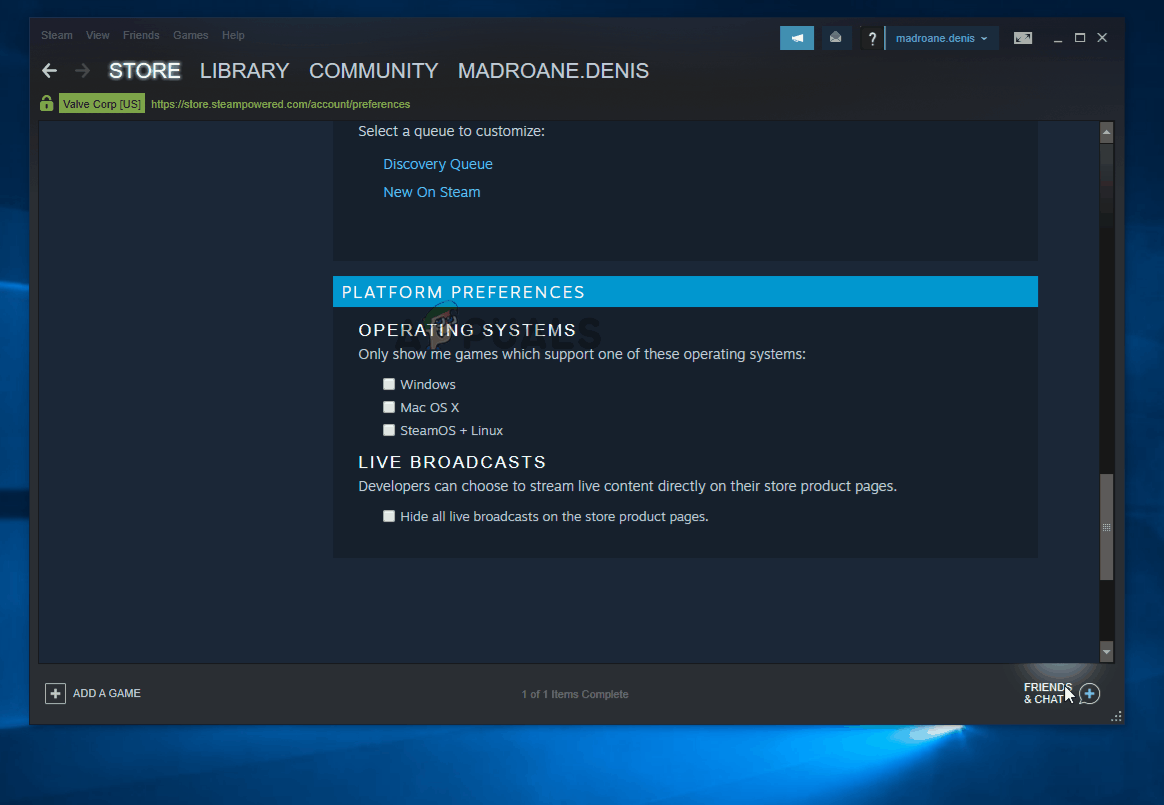
Equally information technology turns out, Steam is yet another awarding that might exist causing automatic microphone level adjustments on a Windows x computer. If you take Steam installed and it'south configured to launch automatically at every organisation startup, chances are it has the capabilities to brand microphone level adjustments.
Several affected users take reported that they managed to resolve the result by accessing the Friend List's settings of the Steam client and disabling the Automatic volume/gain control setting from the Automatic Settings menu.
Here's a quick guide on preventing Steam from automatically adjusting the microphone level via the Friend's list window:
- Open the Steam client, log in with your account and click on the Friends & Chat icon in the bottom-correct corner of the screen.
- Within the Friends & Chat window, click on the gear icon located in the top-right corner of the screen to admission the Settings carte du jour.
- Once you're inside the Friends List Settings, click on the Phonation tab from the vertical menu on the left, then move over to the correct pane, whorl down to the bottom of the screen and click on Show Avant-garde Settings.
- From the Advanced settings menu of the Voice tab, disable the toggle associated with Automatic volume/gain control.
- Restart Steam and run across if the automated book adjustments are still occurring.
If this method wasn't applicable to your current situation, move down to the next method below.
iii. Preventing applications from taking exclusive control of the Microphone
Several afflicted users accept reported that they managed to resolve the effect subsequently re-configuring the MIcrophone settings so that no awarding is allowed to take exclusive command of the device. This procedure is quite piece of cake to replicate and is effectively disables any type of 3rd political party intervention that might crusade the automated microphone level adjustments.
Simply keep in heed that this procedure might as well crusade some vocalization features to stop functioning as intended. Merely go on this in heed before implementing this, and in case some functionality is affected, reverse engineer the procedure below:
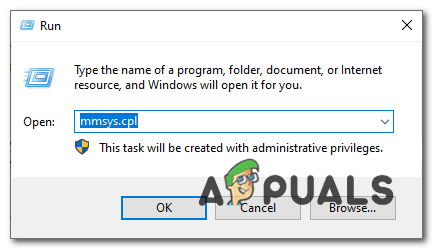
- Press Windows key + R to open up a Run dialog box. Then, type "mmsys.cpl"within the text box and press Enter to open the Sound window.
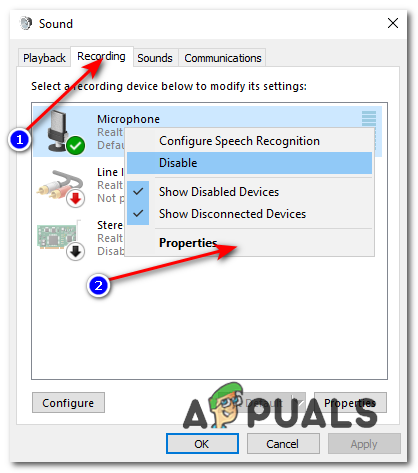
- Once y'all're inside the Sound window, select the recording tab from the horizontal menu. Then, select the microphone that you lot're having problems with, and click on Properties.
- When you're inside the Properties carte of the recording device, select the Advanced tab, and so go to the Exclusive Mode section and uncheck the box associated with Allow applications to take exclusive control of this device.
- Click Use to save the changes, so restart your estimator and see if the issue has been resolved at the next system startup.

If the result is all the same not resolved, motility downward to the next method below.
four. Modifying the Microphone Value Manually
If you're looking for a quick fix, y'all can probably override whatever is automatically adjusting your microphone level past setting a default value for your microphone level via Command Console. As reported by several users, this process has the potential of overriding a lot of level changes that are triggered by third party applications.
But keep in listen that this procedure will non allow you to pinpoint the real crusade of the issue and will override any microphone level previously established by most third party applications.
Here'due south a quick guide on modifying the microphone value manually to fix the car adjustment of the microphone on Windows 10 :
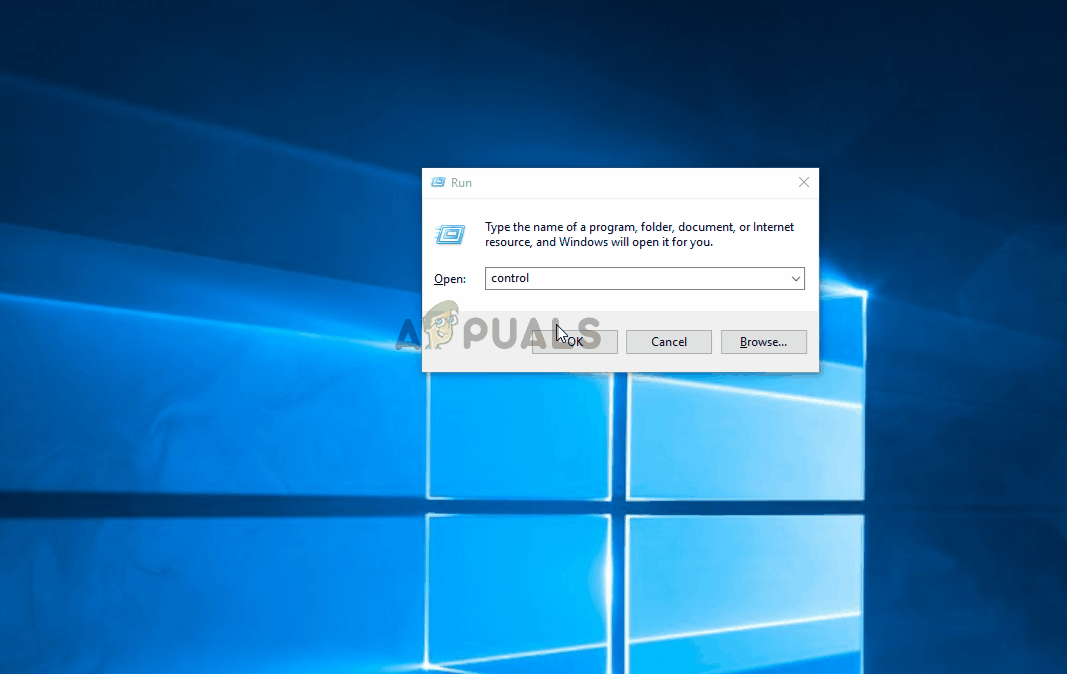
- Printing Windows key + R to open upwards a Run dialog box. So, blazon "control" within the text box and press Enter to open upwardly the classic Control Panel interface.
- Once you lot're inside the classic Control Console interface, use the search role in the top-right corner of the screen to search for 'sound'.
- Then, click on Sound from the listing of results.
- When y'all're inside the Sound window, select the Recording tab, select the microphone/headset that is currently active and clicks on the Properties button.
- In one case you're within the Properties of the recording device that you've selected at step 4, go to the Levels tab and adapt the value of your microphone level using the slider. Click Apply to relieve the modification.
- This should ensure that the microphone value remains the aforementioned regardless of what the 3rd party program tries to modify it in the future.
If this procedure wasn't applicable to your electric current situation or you're looking for a different approach, move down to the next method beneath.
5. Updating your Microphone Driver
Your microphone drivers can also be responsible for levels inconsistencies. You might as well be able to resolve the result past updating your microphone drivers or by uninstalling the current driver, forcing Windows to install a new driver of your recording device.
Several affected users take reported that this procedure resolved the result indefinitely for them. Here'due south a quick guide on using Device Manager to update your microphone driver:
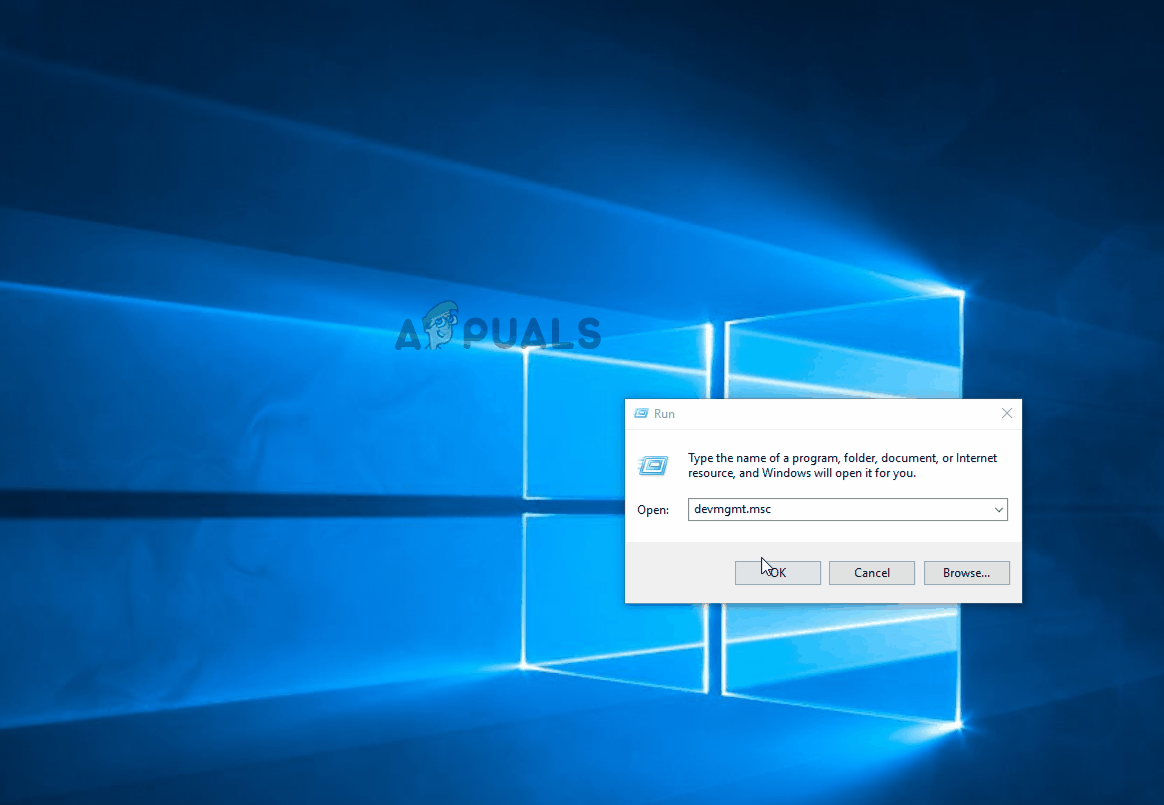
- Press Windows primal + R to open up a Run dialog box. Then, type "devmgmt.msc" inside the text box and press Enter to open up Device Manager.
- Once yous're within Device Manager, scroll through the list of available devices and expand the tab associated with Sound, video and game controllers.
- Right-click on the recording device that y'all're having bug with and choose Properties from the context menu.
- When yous're inside the backdrop screen of your recording device, select the Driver tab and first by clicking on Update Commuter.
- Then, from the next screen, click on Search automatically for updated driver softwareand wait to encounter if the utility manages to discover a new driver version for the driver.
- Once the procedure is complete, restart your figurer and see if the automatic microphone level adjustments are still occurring. If they are or Device Manager has been unable to find an updated version of the commuter, go on with the steps below.
- Follow step 1 to 3 once again to return to the Driver tab of your Recording device, but this time click on Uninstall Device instead of Update Driver. Then, click Uninstall again at the confirmation prompt and wait for the procedure to consummate.
- Once the recording commuter is uninstalled, restart your figurer to allow Windows Update to install a make clean commuter instead of the i you've just uninstalled.
- When the startup sequence is consummate, see if the microphone auto adjustments are still happening.
If you're still encountering the same issue, move downward to the next method below.
6. Removing the Malware Infection
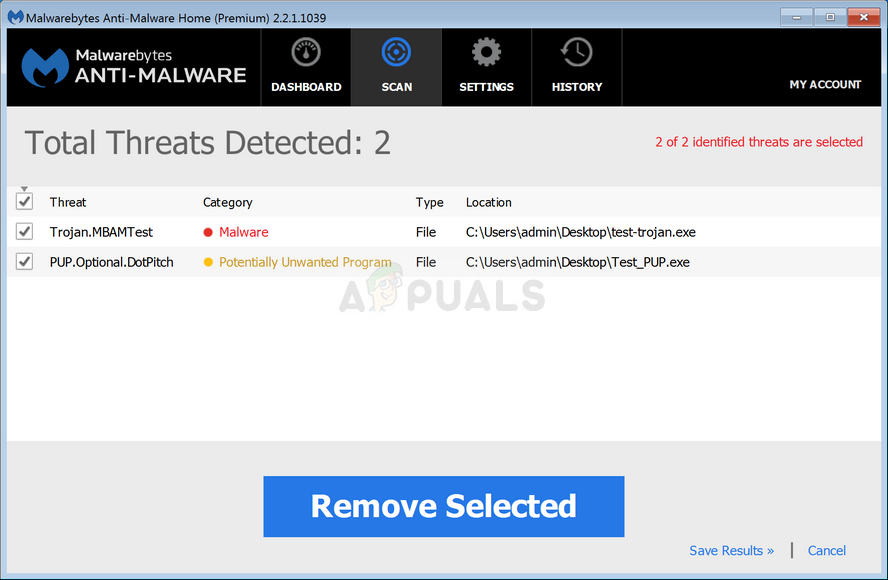
As it turns out, this particular issue tin also be caused by malware that is capable of shutting the mic or adjusting the level automatically. Several affected users have reported that Windows Defender and a few other 3rd party clients didn't manage to find the malware when they performed a security scan.
All the same, most users that encountered this outcome accept reported that they managed to identify and isolate and quarantine the malware by using Malwarebytes. In about cases, the malware made information technology's manner to the organisation from a catcher application or extension. If you think the upshot might be acquired by malware, follow this article (hither) for steps on installing and performing a deep scan with Malwarebytes.
If the virus scan hasn't revealed whatever testify of a virus infection, move downwards to the next methods beneath.
7. Performing a Make clean Kick
If you've come this far without a result, it's possible that the issue is being caused by a 3rd party application that has admin access. If the culprit is non credible to yous, you can verify whether a 3rd party app is causing the trouble past performing a make clean boot.
Several affected users have confirmed that this process allowed them to confirm that the consequence was being acquired past a third party app intervention. In one case they managed to confirm that an application was causing the automatic microphone adjustments, they eliminated all potential culprits until they managed to isolate the application that was producing the error.
Hither's a quick guide on how to perform a make clean kicking in lodge to make up one's mind which application is causing the automated microphone adjustments:
- First, get-go by ensuring that you're using a Windows account that has authoritative privileges.
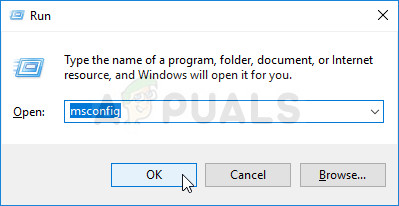
- Then, press Windows key + R to open a Run dialog box. Inside the text box of the Run command, type "msconfig" and printing Enter to open up the Organization Configuration window. When you're prompted by the UAC (User Account Control), click Yeah to grant authoritative privileges to the Organisation Configuration window.
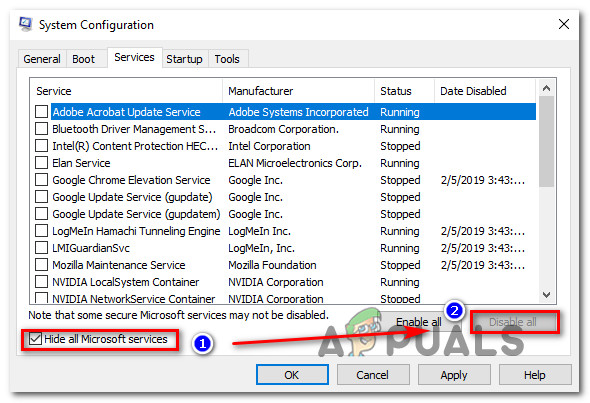
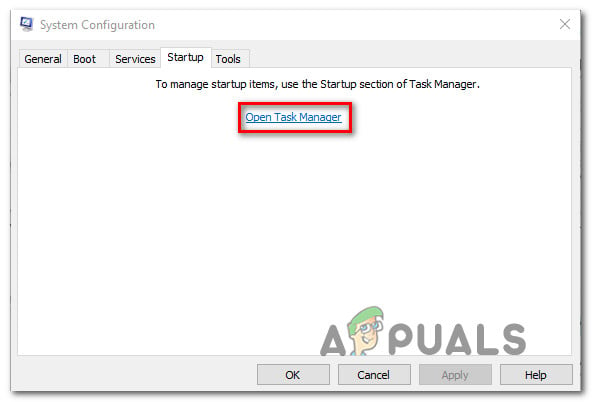
Running MSCONFIG from a Run dialog box - In one case you manage to get inside the System Configuration window, select the Services tab from the ribbon bar at the meridian and starting time by checking the box associated with Hide all Microsoft services. Once you've down that, plow your attending to the remaining services. Click the Disable all button to preclude whatever tertiary political party services from interfering with the microphone levels at the next startup.
Disabling all Windows services - Click Employ Changes, then select the Startup tab and click on Open Chore Managing director.
Opening the Job Manager via Organization Configuration - In one case yous're within the Startup tab of Task Manager, select each service individually and hit Disable to forestall it from running at the next system startup.
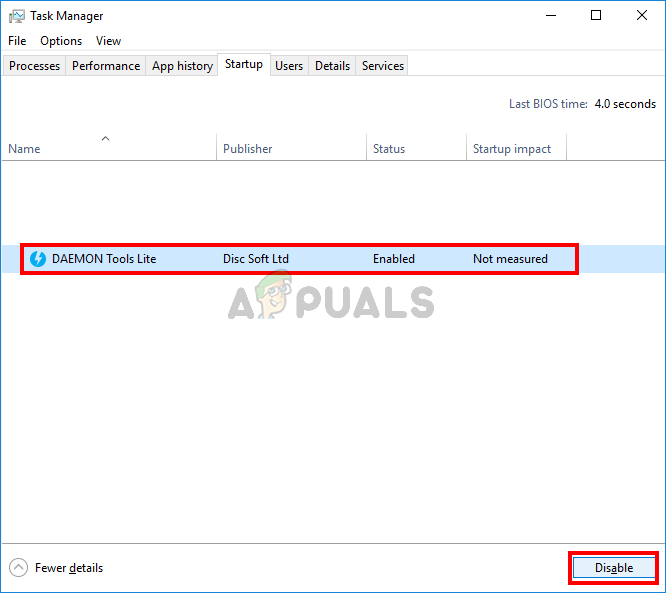
Disabling Apps from Startup - One time all necessary items and services accept been disabled, shut the Task Manager window you've simply opened and restarted your reckoner to boot up into a Make clean Boot State.
- Once the next startup sequence is complete, apply your estimator unremarkably and see if you're nonetheless noticing automated microphone adjustments. If you aren't, follow steps 3 to 5 and systematically re-enable all startup items & services that you disabled and reboot to see which 1 of them is causing the fault.
- When y'all manage to place the culprit, ensure that it remains disabled.
8. Disabling Microphone Enhancements
The Microphone sound enhancements can likewise be a problem in some cases, it'due south possible that your Microphone is self-leveling itself because of these Enhancements, Follow these steps to disable the Audio Enhancements from your Microphone:-
- Press and hold the Windows fundamental then press the R fundamental to open the Run program.
- At present type "mmsys.cpl", then press enter.
Opening Microphone Properties - Now head over to the "Recording" tab, then right-click on your Microphone and click "Backdrop".
Opening the Microphone properties - Click on the "Enhancements" tab in your Microphone Backdrop.
- Make sure to check the "Disable all enhancements pick".
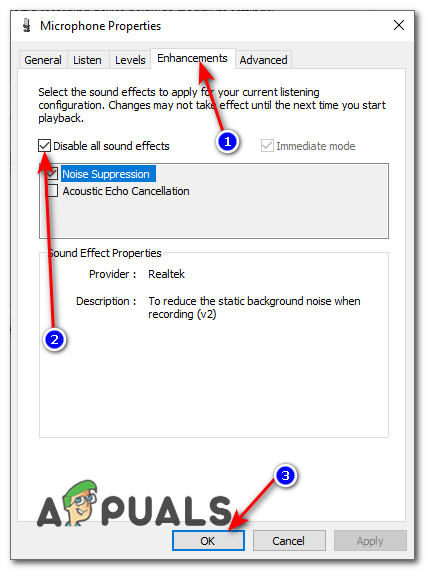
Disabling all microphone enhancements
ix. Registry Fix
Sometimes, the issue lies with the registry configuration of the microphone level. Windows might have stored a value in the registry for your Microphone level which might receive precedence over the transmission value that you select from the Sound Control Console. You tin can adjust this value by:
- Press "Windows" + "R" to open up the run prompt, type in "Regedit" and press "enter".
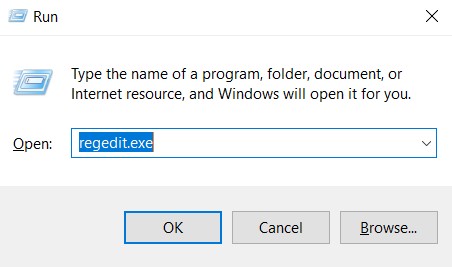
regedit.exe - Navigate to the following location.
HKEY_CURRENT_USER\Software\Microsoft\Speech\RecoProfiles\Tokens\{95CF724E-B3B5-4D94-A4FB-36AE77A88FE0}\{DAC9F469-0C67-4643-9258-87EC128C5941}\Volume - Double click on the following value.
HKEY_LOCAL_MACHINE\SOFTWARE\Microsoft\Oral communication\AudioInput\TokenEnums\MMAudioIn\{0.0.one.00000000}.{e4e24557-c9f8-46f6-8486-50981fcf3cc5} - Fix its value to the Microphone level that you desire. For Example, 8888 for 88% and 2222 for 22%.
- Cheque to see if the issue persists.
![]()

Source: https://appuals.com/how-to-stop-microphone-from-auto-adjusting-windows-10/
Posted by: adairwilgre.blogspot.com
0 Response to "How To Stop Messages" Disc F Clean Up"
Post a Comment